First Steps
In order to setup your RM1, follow along this few first steps.
Connect to Power and start the system
To power up RM1, simply connect one of the two USB-C connectors to a Computer with sufficient power delivery (5V3A) or use the included power supply. See Device Overview - Power Delivery for more information.
Afterwards, RM1 will start automatically.
Using the integrated touch screen and control elements

The integrated touch screen can be used to scroll lists and access elements directly by simply tapping them. You can also scroll lists by rotating the encoder on the right side of the touch screen. To select list entries, push the encoder.
Rotating the encoder while an audio parameter, such as headphone volume or microphone gain is selected, will adjust the parameter. Push the encoder again to de-select the parameter and continue selecting another parameter.
The multicolor push-buttons on the left of the touch screen are context-sensitive as well. On the main screens, they will be hard linked to switching microphone 1 and microphone 2 on (red color) & off (no color). If the button performs another action, such as back, it will be lit in the color of the respective action label beneath it in the screen.
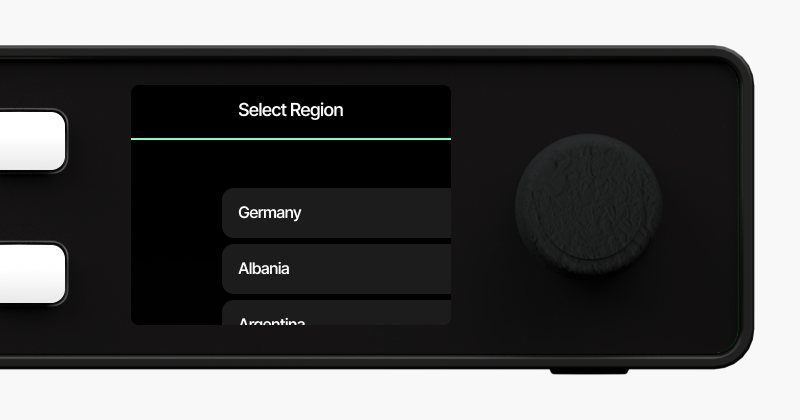
First Launch - Region Select
After first launch, the RM1 will ask you to select your region to setup the wireless connection accordingly. Scroll the list using the encoder. To select a region, press the encoder or touch it on screen. Afterwards, confirm your selection.
Connect Headphones

Protect your hearing from high volume levels. Permanent hearing damage may occur when headphones are used at high volume levels for a prolonged time.
Use the 6.3mm headphone connectors on the front to connect a pair of headphones. If your Headphone have a 3.5mm jack, you require an adapter.
Afterwards, adjust the headphone volume by selecting the headphone on the screen and rotate the encoder until the level you wish is reached.
If your headphone level is too low, you may disable High volume safety on the settings page. This happens on your own risk.
Connect Speakers/Monitors
Use the balanced out 1 (left) and out 2 (right) XLR connectors on the rear side to connect a pair of speakers. Afterwards, adjust its volume by selecting Out on the screen and rotate the encoder until the level you wish is reached.
Speakers can be automatically muted if a microphone is switched on. This is to prevent unwanted audio feedback. Mute speakers when mic is on setting will disable / enable this feature.
Connect Microphone
Use the XLR connectors mic 1 and mic 2 using a standard 3-pin XLR cable. You can use any professional XLR microphone with RM1, no matter if a dynamic or condenser which requires 48V phantom power.
Basic Microphone Setup
Tap on Mic 1 or Mic 2, to enter the access screen for the respective microphone. Here you can select if you require phantom power and set up gain as well as load presets.
If you use a condenser microphone, such as a BCM 104 or NT1a, you need to enable phantom power. To enable phantom power, tap the 48V toggle switch, or select it via the encoder.
To setup microphone gain, select Gain on the list and use the encoder to adjust it. Below the Mic X label on the left, you see the input peak meter, displaying the input volume.
While adjusting the microphone gain, talk at a natural level. We recommend to keep at least a hand wide distance between your mouth and the microphone. Make sure you stay within the 'sweet spot' somewhere at 3/4 of the peak meter. If the peakmeter becomes red, even just for a short moment, reduce your gain setting.
More enhanced settings as well as Auto Level Gain are possible via the device's Web UI.
RM1 features high end DHD audio broadcast preamps with a very noise floor as well as a high signal-to-noise ratio. There is no need to use a lifter or line booster with your microphone to achieve more gain. Using a lifter will introduce more noise to the microphone signal.
A good microphone as well as microphone processing is key for great audio quality.
Load Microphone Preset
RM1 comes with ready-to-use microphone presets, covering the most common microphones used in podcasting and broadcasting. These presets are tailor made for podcasting and live streaming at a broadcast quality level.
If your microphone is not listed or you are unsure, use the generic presets, made for each kind of microphone.
To load a microphone preset:
- Tap on
Mic 1orMic 2, to enter the access screen for the respective microphone. - Tap on
Presets > - Select a preset from the list to load it
You can also create custom presets, not only for microphones. To do so, use the Web UI.
Connect via USB
To connect RM1 to your computer via USB, you can either use the stereo or 16ch USB connectors.
Stereo USB
This connector provides simple, class compliant USB. You can use it to insert playback or other audio signals into RM1. It is configured as a Talk output, used as a clean return, e.g. for video calls. Stereo USB returns everything except USB Stereo Output (itself). This is to prevent feedback / echo on phone calls.
16ch Multichannel USB
16ch USB connector provides multichannel USB audio, available as ASIO or WDM (driver installation required). For an exact Input & Output list, see Inputs & Outputs.
This output can be used to do multichannel recordings of all input signals or to serve various playback signals.
Connect to an Apple Device (macOS / iOS / iPadOS)
When connecting RM1 16ch USB to an Apple device no special steps are required except plugging in the cable.
All channels of the audio interface are instantly available for usage within Apple devices via the system-integrated Core Audio driver.
Connect to Windows
To make use of the RM1 16ch USB connected to a Windows PC it is necessary to install the correspondent USB Audio Driver.
Follow the next steps to setup the operating system accordingly.
1. Download the Driver
Download the current Windows® audio driver version:
RM1 USB Audio Driver Version 2.10.0.3 (zip)
2. Install the Driver
Unzip the file and start the included executable. Follow the steps in the installer.
When the installation is finished there will be installed the suitable
- ASIO driver
- WDM / WASAPI driver
3. Connect RM1
Plug the USB cable. Windows device manager will initially setup the new audio interface in the background.
4. Setup RM1 as Audio Source & Sink in Windows
Now you're nearly ready to use the audio interface. When you check the Sounds menu, you will find 8 (stereo) RM1 associated Audio Playback and 8 Recording devices:
Now check the audio interface settings in Windows® for each of the 8 associated Audio Playback and 8 Recording entries according to the current sample rate (mostly 48kHz, 24bit).
Recommendations
Recommended to use ASIO for record/playback. In the case of audio glitches check and modify the ASIO latency settings to use bigger audio buffers. Start with the Relaxed setting.
In the case of further audio glitches/drops, check the following:
- close/reopen the audio application
- restart your PC
- restart RM1
- check again the USB buffer sizes and try an ASIO latency setting with bigger buffers
- use a DPC Latency checker tool in order to learn about drivers/applications that interfere with general realtime processing requirements
Activate RM1
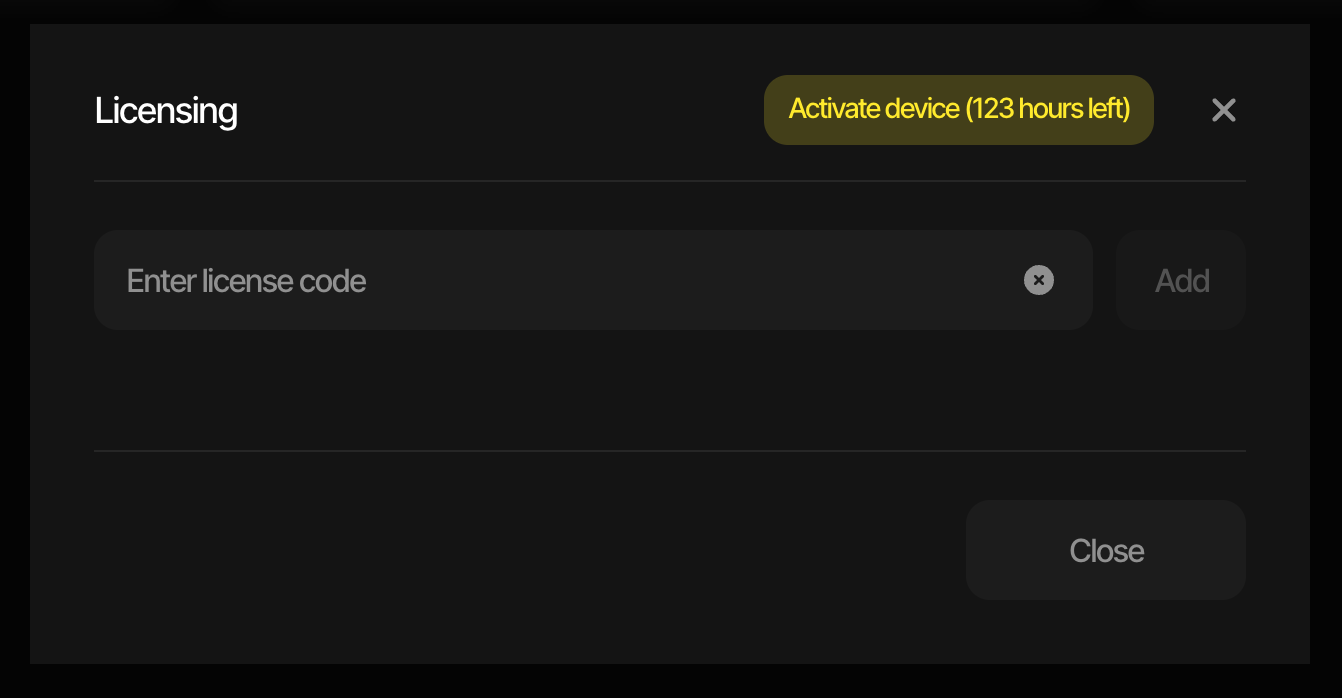
Depending where you bought your RM1, you may have to enter a license key to activate RM1 and make it fully operational. Without successful device activation, RM1 will fully operate for 800 hours. After 800 hours of operation without activation, the system will be interrupted by a random reset once per hour.
RM1 will notify you on the integrated touch screen as well as on the Web UI that the device needs to be activated. This activation license key must be obtained by your distributor or the sales contact where you bought RM1.
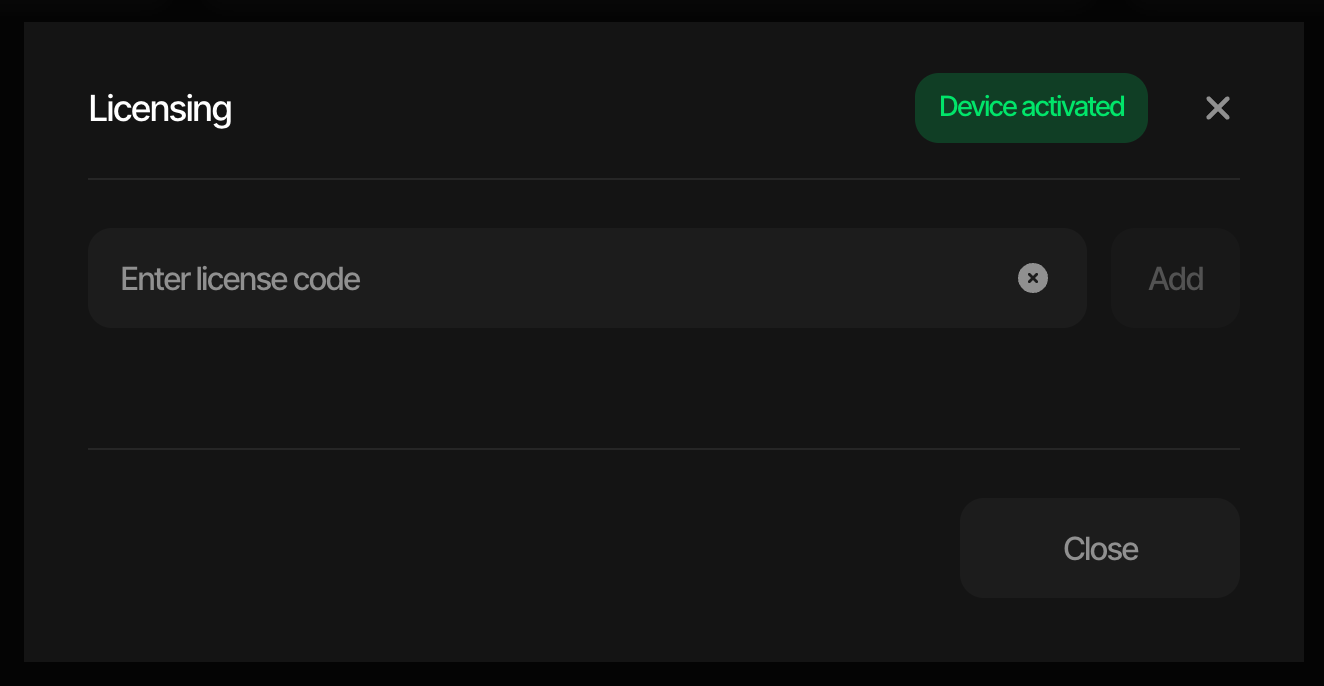
Enter the license key
To enter the license key, follow these steps:
- Connect to the RM1 Web UI (see Connecting to the Web UI)
- Navigate to
Settingsview and clickLicensing - Enter the license key in the field and click
Add - RM1 will confirm the device is now licensed. If not, please make sure you refresh the web page and try again.
See the current license status and remaining hours
To see the current license status and remaining hours, follow these steps:
- Connect to the RM1 Web UI (see Connecting to the Web UI)
- Navigate to
Settingsview and clickLicensing - On the top right corner of the modal, the license status is displayed.
- If the device is activated,
Device activatedwill be displayed. - If the device is not activated,
Activate Device (X hours left)will be displayed.